

Let’s talk about to-do list bankruptcy. You know the feeling: that digital task manager, once a source of clarity, is now an overwhelming graveyard of overdue deadlines and unchecked boxes. You’ve stopped adding new tasks because, let’s be real, what’s the point? You’re not looking at it anyway.
This is when I turn to the bullet journal.
Not as a cute productivity trend. Not as an aesthetic ritual. But as a tangible reset.
Why Bullet Journaling Works When Digital Fails
A digital to-do list is like a treadmill: tasks pile up, deadlines roll forward, and the backlog grows whether or not you engage with it. A bullet journal, on the other hand, is a full stop. A chance to take inventory and start fresh.
Here’s what happens when you write every single task down, by hand:
- You reclaim control. Instead of endless scrolling and snoozing notifications, you make conscious decisions about what actually deserves your attention.
- You process priorities differently. Writing slows you down just enough to engage with the task—how urgent is it, really? Is it still relevant?
- You get to start over (without losing everything). Digital tools accumulate; analog lists force you to curate. If a task is truly important, it will resurface.
Declaring Digital Bankruptcy
So, when do you know it’s time to wipe the slate clean? When your to-do list has stopped functioning as a tool.
- When you’ve stopped adding new tasks because it feels pointless.
- When you’re missing things despite having them written down.
- When the weight of the backlog is heavier than the clarity it’s supposed to provide.
This is your sign to pause, reset, and go analog.
… and bring back the paper planner.
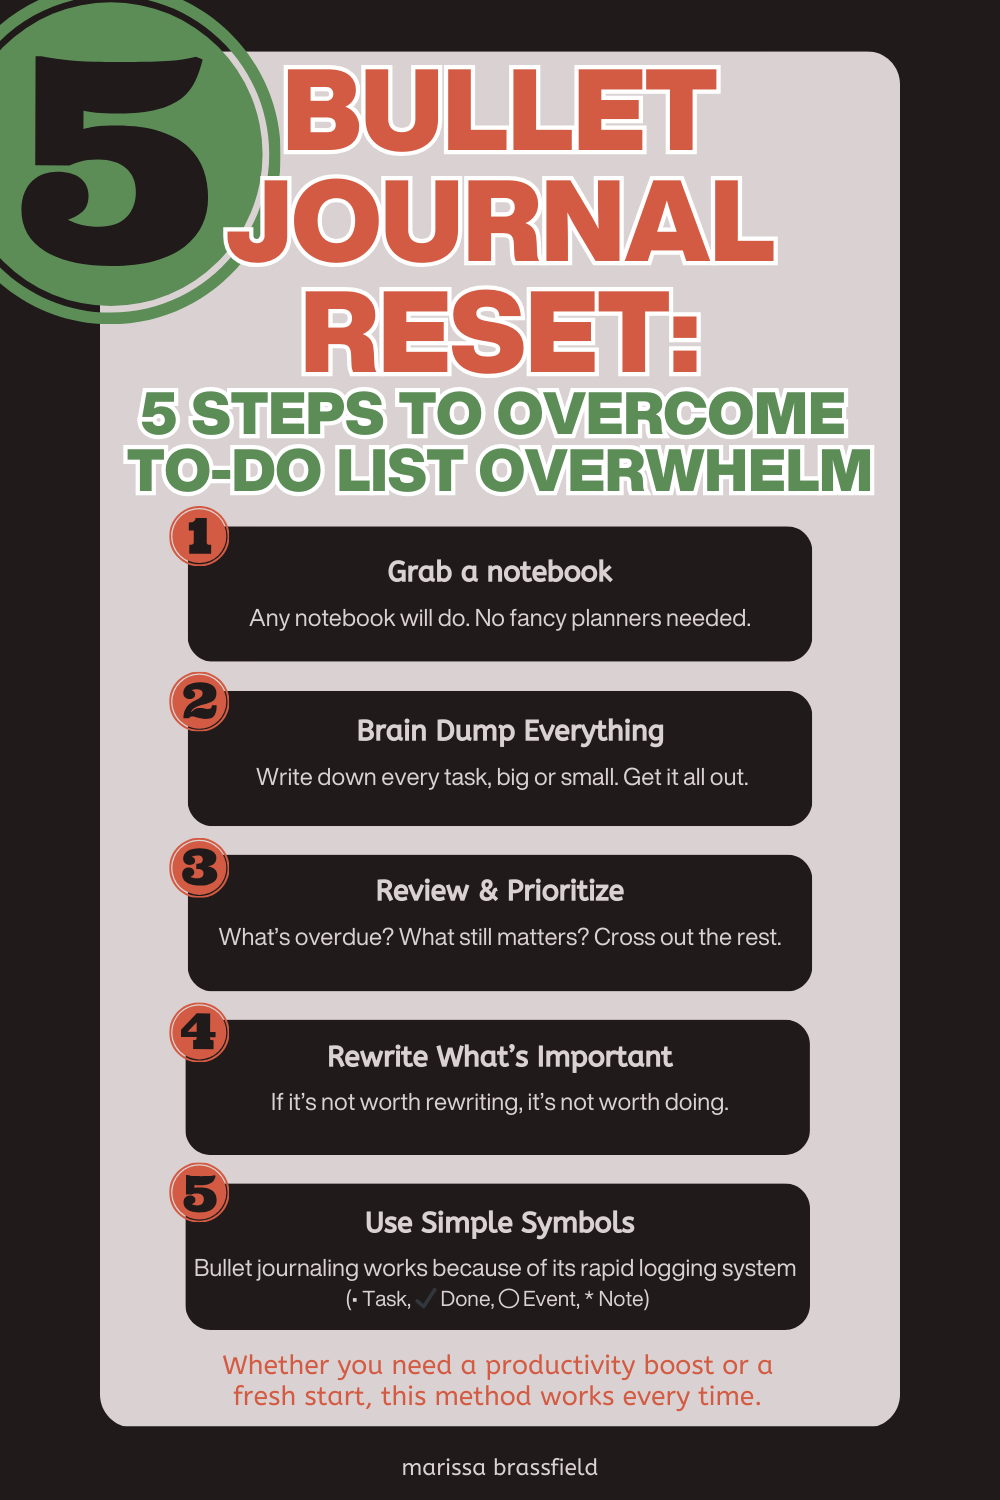
The Reset Ritual
- Get a notebook. Any notebook. It doesn’t need to be fancy.
- Write down every single thing on your mind. The big, the small, the nagging.
- Look at what’s there. What’s overdue? What’s been lingering for months? What actually matters?
- Rewrite what’s worth keeping. If it’s not worth writing down again, it’s probably not worth doing.
No templates. No overcomplication. Just a pen, a list, and the space to reclaim your priorities.
Digital Tools Have a Place—But Not Always
I still use digital tools. They’re powerful for automation, collaboration, and long-term tracking. But when my system stops working for me, I don’t work harder—I pause and recalibrate.
A bullet journal isn’t a permanent solution—it’s a lifeline when things spiral. And sometimes, that’s exactly what you need.
What Makes Bullet Journaling Different?
So why does this method work when digital tools fail? It’s not just about writing things down—it’s about the way bullet journaling forces you to engage differently with your tasks.
If you’ve ever abandoned a planner mid-year or felt trapped by rigid productivity systems, bullet journaling offers a refreshingly flexible approach. Here’s what sets it apart:
🔹 Everything in One Place → No more jumping between apps, searching for notes, or losing track of half-written ideas. It all lives in one simple notebook.
🔹 Custom Structure, No Rules → Unlike traditional planners, a bullet journal adapts to your needs. Need a weekly spread one month and a daily log the next? You decide what works.
🔹 Rapid Logging → The magic is in the symbols. Simple bullets distinguish tasks (•), completed items (✔), events (○), and notes (*). No fluff, just clarity.
🔹 Migration = Intentionality → Unfinished tasks aren’t just rewritten; they’re reconsidered. If something keeps getting pushed forward, is it truly a priority?
🔹 Built-in Reflection → Unlike digital lists that grow endlessly, bullet journaling invites review. You naturally pause, assess, and recalibrate instead of mindlessly adding more.
It’s not about the perfect notebook or artistic spreads (unless you want it to be). It’s about having a simple, adaptable system that works for you—especially when you need a reset.
Share this with someone who thrives on adaptable systems and efficiency!
Let’s meet up on social!
P.S. Read this if you’re struggling with constant distractions.


Member discussion