This is a guest post by Camille Holden.
Marshall McLuhan famously said, “We become what we behold. We shape our tools, and thereafter our tools shape us.” But as 21st century workers, we don’t usually get to shape our tools, they are just handed to us and we’re expected to be able to use them.
Think of the tools you use every day: Outlook, Excel, PowerPoint…
The problem is that the tools we get handed are built to work for everyone; they’re generic and dumbed-down for mass use. So what does this say for us, the workers, who will become shaped by our tools?
[contextly_sidebar id="DOCEGTCQAUwYuhqUDlyQ3JAAUw7FwKEF"]It is possible however, to make this work in our favor. Even though we may not be coders or software engineers, there are still several ways we can reclaim control over our tools and start shaping them to fit our needs. For PowerPoint, it’s customizing the Quick Access Toolbar and getting familiar with some keyboard shortcuts.
Although I’ll show you how to do it in PowerPoint, you can do it in all the other programs in the Microsoft Office Suite, and the overall techniques can be applied to just about any other software you use for work.
Customizing Your Quick Access Toolbar
Most people haven’t heard of the Quick Access Toolbar (QAT), but it’s by far the best tool in PowerPoint for productivity, as it not only places your favorite commands closer (you don’t have to dig through your Ribbon for them), but it also turns them into hotkeys that are activated by the Alt key.
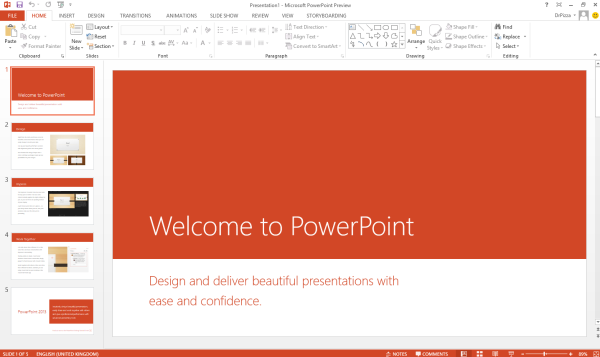
Here is what the default QAT looks like in PowerPoint 2013 (sometimes it’s above the Ribbon instead of below, as it is here):

Customizing your QAT is pretty simple and quick, and you’ll only have to do it once on your version of the software.
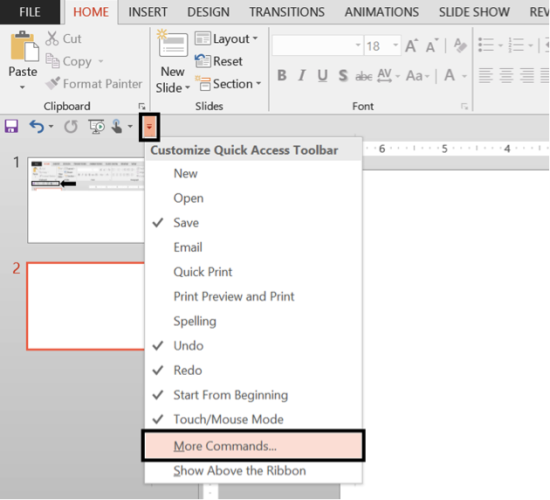
To make changes, simply click on the small downward facing arrow on the far right of the QAT and select “More Commands”:

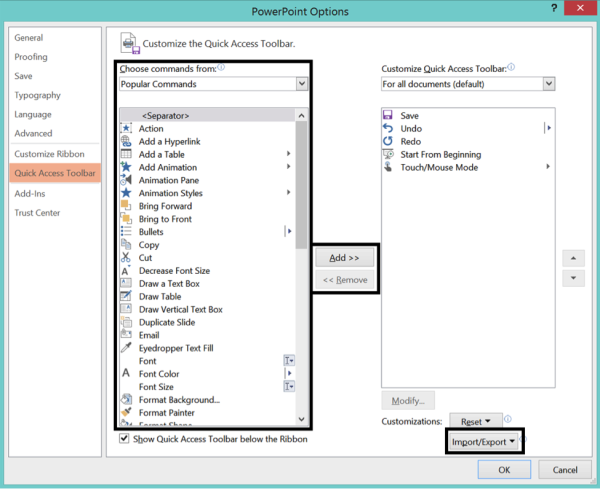
The PowerPoint Options dialog box will open and you can use the search boxes on the left to find all the commands you’ll want to put onto your QAT, including some that don’t even appear in the Ribbon at all (such as the Merge Shapes Tool, which is helpful for doing things like breaking out the middle piece of a Venn diagram).

Once you’ve found a command you want, use the ‘Add’ button to put it onto the QAT. You can also use the ‘Remove’ button to take away the unnecessary default commands (i.e you probably don’t need ‘Save’ since you know Ctrl+S).
Organize your commands however you feel is most comfortable. You can add to group them into categories, and you can reorganize them using the arrows on the far right. You can even import an existing QAT customization file or export your own to use it elsewhere.
So what should go on your QAT?
If you’re considering what commands to put here, ask yourself whether it meets one of these two requirements: It’s a command you use it ALL THE TIME; or it’s buried somewhere deep in the Ribbon or isn’t even on the Ribbon to begin with.
Here’s what my QAT looks like and how it’s organized:

Part 1: Keyboard Section (I hit these using the Alt key)
- Alt, 1 - The Alignment Tool
- Alt, 2 - Font Color
- Alt, 3 - Shape Fill
- Alt, 4 - Shape Outline
- Alt, 5 - More Options
- Alt, 6 - The Arrange Tool
- Alt, 7 - Font Size
- Alt, 8 - Collapse All (sections)
- Alt, 9 - Expand All (sections)

Simply hit 1 and the Alignment Tool will open up. Hit 2 instead, and you’ll be able to change the font color…all without ever leaving your keyboard!
Part 2: Mouse Section (I hit these with my mouse)
- Rectangle
- Straight Connector
- Draw a Text Box
- Shapes
- Merge Shapes
- Draw Borders
- Borders
Pick the commands and the layout that best work for you and suit the tasks you are asked to perform in PowerPoint.
Want to get this QAT without the hassle? Simply go to my blog and subscribe, and you’ll get this QAT customization file, an installation video, and email help with using this awesome tool.
Know Your Shortcuts
Now that you have your QAT setup for your most frequently used commands, you’ll want to become familiar with some of the other great time-saving shortcuts available in the software.
Although PowerPoint shortcuts aren’t the most exciting, they’re incredibly important. To a power-user, watching you use PowerPoint is like watching your parents or grandparents use a computer…You can’t help but want to say: “What are you doing?!”
Must-Know PowerPoint Shortcuts
So here are the majority of the important shortcuts you’ll need to build any slide deck in PowerPoint, conveniently compiled into an infographic you can print out and place on your desk:
Must-Know PowerPoint Shortcuts: A Visual Guide from Camille HoldenStart practicing these keyboard shortcuts, and just like with the QAT, make sure you focus on the ones that you will need to use most. At first it will feel awkward and perhaps even like a chore, but trust me, memorizing these are 100% worth it as they’ll cut down the time you spend in PowerPoint and get you back to your primary tasks.
My personal favorites are the Ctrl+D to duplicate an object and then Ctrl+Shift+D to duplicate a slide, as they’re twice as fast as the copy-paste shortcuts. I use them all the time!
Don’t Limit Yourself
Now that you have your QAT set up and have learned a bunch of the top time-saving keyboard shortcuts, your life in PowerPoint will dramatically be improved! ______________________
Camille Holden is the co-founder of Nuts & Bolts Speed Training which delivers time-slashing and actionable PowerPoint training for working professionals who spend hundreds, if not thousands of hours a year using the program.


